Deliciously Nutty Special K Bars
Craving a quick and healthy snack? Try my yummy Special K Bars! Packed with peanut butter and honey, they’re perfect for an energy boost anytime.

- What’s the Buzz About Special K Bars?
- Essential Ingredients Guide: Your Go-To for Delicious Special K Bars
- Mastering the Art of Cooking: Professional Methods Made Simple
- Pro Tips & Secrets
- Perfect Presentation
- Storage & Make-Ahead
- Creative Variations
- Complete Nutrition Guide
- Expert FAQ Solutions
- Recipe Card
What’s the Buzz About Special K Bars?
Let me take you back to one of those hectic mornings where i was running late, barely had time to grab a cup of coffee, and figured i could use a boost to get my day started right.
I rummaged through the kitchen cabinet and—bam!—there was that box of special k cereal . in a wild moment, i thought, why not whip up some no-bake special k bars? and oh my gosh, i can’t believe how quickly they came together! now, these aren't just any snack; they’re chewy, crunchy, and sweet.
Seriously, this recipe has become my go-to for a quick breakfast or that little pick-me-up during the day.
A Tasty Blast from the Past
So, where do these yummy special k bars come from? they started from that classic special k cereal we all grew up with.
It’s been a staple in american pantries and for good reason! these bars have become super popular because they’re perfect for busy lifestyles.
In under 45 minutes , you can have about 12 bars hanging out in your fridge, ready to be devoured.
And let’s be honest, they’re ridiculously easy to make—like, we’re talking no-bake magic here!
The cost? totally doable. you’re mostly looking at pantry staples like honey, peanut butter, and cereal, which won’t break the bank.
Plus, they yield enough bars to share or have handy for yourself all week.
Why You Should Make Them Today
Now, let’s get real about the benefits. these easy energy bars are not just delicious, but they pack a nutritional punch, too.
We’re talking about healthy nut bars that are loaded with protein! each bar is around 160 calories and gives you about 5 grams of protein to fuel your day without the heavy sugar crash.
I mean, who wouldn’t want a little wholesome goodness between their meals?
And the versatility? oh man, you can make these bars your own! want something a bit nutty? throw in some chopped almonds or drizzle on some chocolate chips.
You’d be amazed at how customizable these homemade special k treats can get. are you hosting a party? these bars are the ultimate crowd-pleaser for a special occasion .
Switch things up with different mix-ins, and they could even become your new signature snack!
Let’s not forget, with these gluten-free cereal bars , you can accommodate friends with dietary restrictions. Just make sure to grab gluten-free oats and double-check your add-ins.
Let’s Get Cooking!
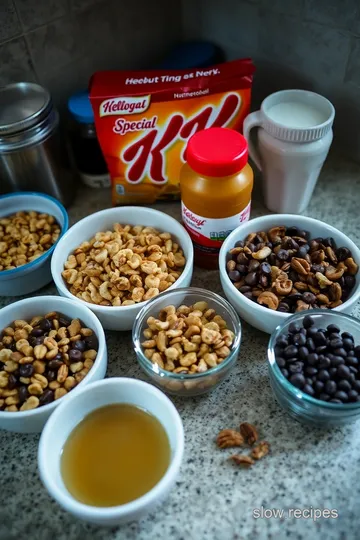
Alright folks, ready to dive into the recipe? before you whip out the mixing bowl, gather your ingredients. you’ll need special k cereal , honey, peanut butter, and, depending on your taste, some extras like nuts or chocolate chips.
It’s a simple homemade bars recipe that proves you don’t need to be a master chef to turn your kitchen into a snack sanctuary.
Trust me, making these chewy peanut butter bars will not only feed your cravings but also make you feel pretty accomplished.
And hey, they’re great for lunchboxes! whether you’re prepping for the week or trying to inspire your kids to eat something homemade, you’ve got to ensure these bars are the next project on your to-do list!
Curious what else you need to pull this off? Let’s jump into the ingredient section!
Essential Ingredients Guide: Your Go-To for Delicious Special K Bars
When it comes to whipping up those tasty special k bars , getting familiar with your ingredients is key. trust me, knowing what each component brings to the table can elevate your snack game, especially when it comes to easy energy bars recipes like these.
Let's chat about the essentials you need for this fun treat.
Premium Core Components
To start off, the base of your special k bars includes some simple ingredients. you’ve got your 3 cups (240g) special k cereal , 1 cup (240ml) honey , and 1 cup (250g) peanut butter .
Honesty , this combination is a winner. it’s sweet, salty, and oh-so-chewy!
How to Tell If You’re Getting Quality Ingredients:
- Honey: Look for that golden color without added sugars. Raw honey is the best.
- Peanut Butter: Check for natural brands with minimal ingredients—just peanuts and maybe salt. No funky additives!
- Cereal: Stick to the original Special K, but if you do need a gluten-free option, just check those labels.
Storage tips: keep your honey in a cool, dark place. peanut butter can chill in the pantry or fridge, depending on your preference.
Special k cereal should stay in its box, sealed tightly to keep the crunch intact. most of these ingredients will last quite a while, but here’s a quick rundown: honey can last indefinitely, peanut butter keeps well for months, and your cereal is good for about six months once opened.
Signature Seasoning Blend
Now that we’ve nailed down our core ingredients, let’s spice things up. while special k bars are more about their chewy texture than spices, a hint of vanilla extract or a sprinkle of salt can amp up the flavors.
You could even fold in chocolate chips to make them feel like a dessert—but hey, that’s just a suggestion!
Smart Substitutions
What if you’re in a pinch or want to adapt for dietary needs? Not to worry!
- Nut Butter Alternatives: If you're nut-free, swap in sunflower seed butter. It's a solid option and still super tasty.
- Sweetener Swap: Can’t find honey? Try agave syrup. It’s liquid gold too!
- Cereal Alternatives: No Special K? Grab any puffed rice or crispy cereal you have lying around.
Kitchen Equipment Essentials
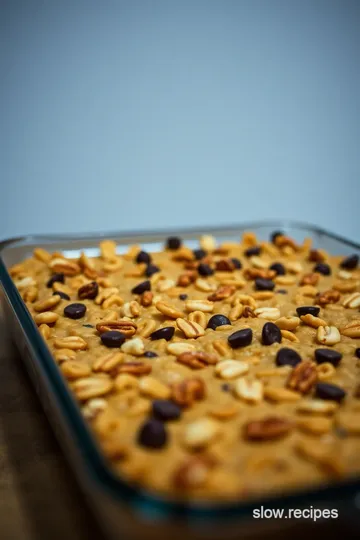
You don’t need fancy gadgets for this, just some basics. grab a mixing bowl, a baking pan (9x13-inch is perfect), and a spatula .
If you want to make your life easier, line that pan with parchment paper for smooth bar removal.
Pro Tip: When you’re spreading that sticky mixture into the pan, use a wet spoon or spatula. It helps a ton with sticking!
Let's Get Cooking!
So, once you’ve got your ingredients ready to go—honey, peanut butter, and some Special K cereal—you’re just about set to make your no-bake Special K bars that are sure to impress.
The combination of sweet and salty hits just right, and they’re perfect for a quick snack when you’re running out the door or need something before your workout! After mixing it all up and pressing it into your pan, just allow it to chill for about 30 minutes in the fridge, and bam—you've got a homemade treat that even kids will love!
You’ll see, the beauty of these bars is how customizable they are. so whether you want nutty snack bar variations or to keep it simple with just the classic ingredients, the possibilities are endless.
So, what do you think? Ready to dive into making these deliciously nutty Special K bars ? Let’s get rolling on those instructions!
Mastering the Art of Cooking: Professional Methods Made Simple
Cooking like a pro doesn't have to feel like a secret club. yeah, it might seem tricky to whip up dishes with the finesse of a michelin-star chef, but guess what? with the right preparation methods and a sprinkle of passion, you can totally nail it! let's dive into some professional cooking methods that can take your kitchen game to a whole new level, starting from essential prep steps to expert techniques.
Essential Preparation Steps
Before you even think about firing up that stove, let’s talk mise en place . this fancy french term just means getting your ingredients sorted and prepped before cooking.
So, chop your veggies, measure your spices, and keep everything orderly. seriously, it saves so much time when you're in the mix.
No one wants to be scrambling around looking for that missing ingredient halfway through cooking.
Time management is your best buddy. when you're juggling multiple dishes, here's what i do: make a detailed list. write out everything in the order you need to do it.
Trust me, this is a game-changer. set timers on your phone for things like boiling pasta or searing meat at medium-high heat .
Honestly, it feels like you’re running a restaurant back there!
Safety considerations ? don't ignore them! always have your kitchen tools in a designated spot. keep that knife work fast but safe.
And remember—hot pans burn! use oven mitts and keep the floor clean. tripping can quickly turn your cooking adventure into a not-so-fun mishap.
Step-by-Step Process
Now, onto the good stuff. Here's a straightforward, numbered guide you can follow when trying out a new recipe:
- Prep your ingredients : Ensure everything is good to go based on your list.
- Temperature control : If a recipe calls for cooking at 375° F , preheat that oven ahead of time. Cooking at the wrong temperature can lead to sad outcomes—like burnt edges!
- Timing precision : Stick to those suggested cooking times. Even an extra minute at medium heat can make or break a dish.
- Visual cues : Look for those golden brown crusts or bubbling sauces! A quick stir can really let you know if something needs more time on the heat.
Expert Techniques
Want to kick it up a notch? learn some expert techniques. for example, mastering the art of sautéing can open many doors.
Get that pan hot and ready, add your oil, and toss in your food. the idea is to get a nice sear—that’s what gives your meats and veggies flavor.
Pay attention to quality checkpoints during cooking. is your pasta al dente? can you perfectly whisk a dressing? practice makes these second nature.
And don't sweat the small stuff—if something goes sideways, troubleshoot! maybe the sauce is too thick? add a splash of broth to loosen it up.
Success Strategies
Now, let’s tackle common mistakes. like, overcooking your steaks because you get distracted by that show you love? not the best idea.
Use a meat thermometer— medium-rare is around 135° f , folks!
When it comes to quality assurance, always taste as you cook. Is it missing salt, or does it need a bit more lemon juice? Remember—cooking is an art, not a science.
And for all you meal preppers out there, make-ahead options are a lifesaver! dishes like my fave, the deliciously nutty special k bars , are perfect for this.
Not only are these no-bake special k bars super easy, but they also hold up well when you need a quick grab-and-go snack.
Whip them up ahead of time and just chill them for about 30 minutes until set.
Conclusion
All said and done, the magic happens when you enjoy the journey. remember, cooking is about chilling out, experimenting, and sharing those homemade treats (like those chewy peanut butter cereal bars ) with friends.
And hey, if you mess up? it’s just more time to laugh and get back to it!
Stay tuned for more tips and tricks in our next section, Additional Information ...where we'll dig deeper into the world of good eats!

Pro Tips & Secrets
Alright, friends! let’s dive into the world of deliciously nutty special k bars . trust me, these treats are super easy to whip up, and i’ve got some insider secrets to help you rock your snack game.
First off, always make sure you press the mixture firmly into your pan. if you don’t, your bars might crumble when you cut them.
No one likes a messy snack, am i right?
Really, chilling them for a solid 30 minutes is key. when you pull them from the fridge, they’ll cut like a dream.
Then there’s flavor. if you wanna jazz things up, try subbing in different nut butters. you know i’m all about customization! almond butter might just be a game-changer for your special k cereal snack bars .
And you can totally throw in some vanilla extract for that extra oomph!
Perfect Presentation
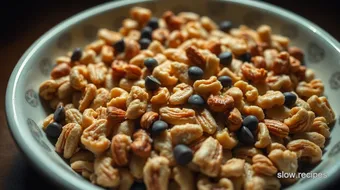
Now, let’s talk about presentation. you want your bars to look as good as they taste. use a sharp knife for slicing.
Seriously, it makes a huge difference ! i mean, don’t get me started on the battle of messy edges.
When you serve, garnish is everything. try placing the bars on a colorful plate. maybe add a sprinkle of sea salt for that sweet and salty vibe.
Or toss on some fresh berries; the pops of color make everything look gourmet. honestly, it elevates your snack game without any real effort!
Storage & Make-Ahead
Okay, here’s the deal. if you wanna plan ahead (and who wouldn’t?), these bars are perfect for making in batches.
Store them in an airtight container in the fridge. they’ll last about a week, but if you’re like me, they’ll disappear way before that!
For extra freshness, consider wrapping each bar in parchment paper. this keeps them from getting stale and makes them easy to grab on-the-go.
And if you need to reheat them, stick them in the microwave for 10-15 seconds . just long enough to soften them up without melting them into a gooey mess.
Creative Variations
Now, don’t hesitate to get creative with these bars! swap out your peanut butter for sunflower seed butter for a nut-free energy bar.
Add a handful of dried cranberries or coconut flakes for a sweet twist. those little additions can totally transform your bars into something new every time!
Thinking seasonally? In the fall, toss in some cinnamon or pumpkin spice. For summer, throw in some dried fruits. The world is your oyster when it comes to customizable cereal bars !
Complete Nutrition Guide
Let’s chat about the nutrition facts! each bar packs a punch with about 160 calories — a nice balance of energy without the guilt.
Plus, it has 5g of protein , which is a decent little boost for your day. and if you're into watching what you eat, these are a great low-calorie snack option.
Remember, if you need a gluten-free option, just grab a certified gluten-free cereal, and you’re set! Always ensure your added ingredients fit your dietary preferences.
Expert FAQ Solutions
Got questions? i’ve got answers! a common one is, “can i use brown sugar instead of honey?” you can, but keep in mind it’ll change the texture a bit, so adjust accordingly! if your bars are falling apart, try pressing them down more firmly next time.
Trust me, you’ll thank me later!
So there you have it — everything you need to know about these oh-so-delicious special k bars! whether you're looking for a quick snack or a healthier sweet treat, these bars have you covered.
They’re simple to make, and you can play around with the mix-ins until you find your perfect version. so roll up your sleeves and get ready to create some homemade special k treats that your taste buds will thank you for! happy snacking, friends!
Deliciously Nutty Special K Bars Card
⚖️ Ingredients:
- 3 cups Special K cereal
- 1 cup honey
- 1 cup creamy or crunchy peanut butter
- 1/2 cup chopped mixed nuts
- 1/2 cup chocolate chips (optional)
- 1/2 teaspoon vanilla extract (optional)
- A pinch of salt (optional)
🥄 Instructions:
- Step 1: Line a 9x13-inch baking pan with parchment paper, leaving some overhang for easy removal.
- Step 2: In a mixing bowl, combine honey and peanut butter. Stir until smooth and well incorporated.
- Step 3: Mix in vanilla extract and a pinch of salt (optional).
- Step 4: Add Special K cereal to the bowl and gently fold until the cereal is evenly coated.
- Step 5: Fold in chopped nuts and chocolate chips if using.
- Step 6: Transfer the mixture to the prepared baking pan and press down firmly with a spatula to create an even layer.
- Step 7: Refrigerate for at least 30 minutes or until set.
- Step 8: Once chilled, lift the bars out of the pan using the parchment overhang and cut them into squares or rectangles.
Previous Recipe: How to Make Sizzling Grilled Kabobs: 5 Delicious Tips for Flavor
Next Recipe: Ultimate Shrimp Fried Rice Near Me: 5 Delicious Secrets to Try!